ros2

iOS一部のユーザだけWKWebViewでエラー( NSErr.code 105 )が発生する – アクセスログは存在するがdidFailProvisionalNavigation

func webView(_ webView: WKWebView, didFailProvisionalNavigation navigation: WKNavigation!, withError error: Error) {
        let nserr = error as NSError

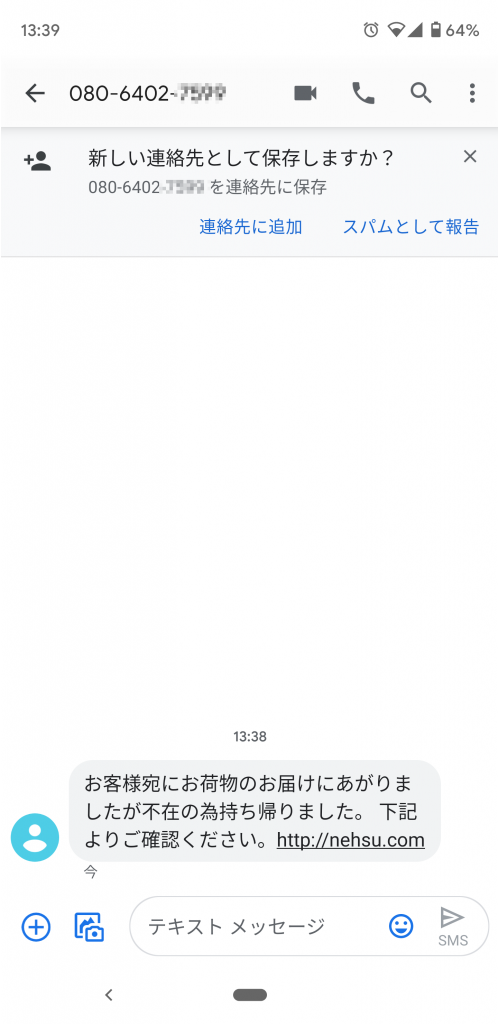
NSLog("didFailProvisionalNavigation :\(nserr.code)")

iOSのアプリでWKWebViewを利用して表示しているページが一部のユーザだけ表示できず、didFailProvisionalNavigation Error 105が発生するので原因調査

自分の環境では発生しないので、一般ユーザから動作ログをレポートしてもらう機能をつけてから、アクセスログと突合させてみると、didFailProvisionalNavigationが発生した場合、アプリに同梱したHTMLを表示させているが、そのHTMLが表示された後、すぐにアクセス失敗したURLのパラメータ欠損みたいなURLに自動的に再度読み込まれる動きをしていることがわかりました。

didFailProvisionalNavigationで発生しているのは105で検索しても情報があまり見つからなかったが、下記のスレッドを発見しました。

https://bugs.chromium.org/p/chromium/issues/detail?id=831381

どうやらペアレントコントロールの影響のようで、Code 105で動きが今回の件と似ています、当初は広告ブロックも疑いましたが、SFSafariViewControllerではなく、wkWebviewなので除外していましたが、ペアレントコントロールはwkWebviewでも動作するようで、多分これです。

試しに再現するユーザー直接連絡してsafariでwkWebviewでエラーとなるページを開いてもらいましたが、アクセスできないとのことでした。

試した限りはコンテンツの内容ではなく、URLのそれっぽい文字列のようでしたので、別のURLを用意してリリースして対応

nodemailerでISO-2022-JPのメールを送信したい( Mailparserじゃなくて送信)

メールの受信プログラムのテストでマルチパートやUTFだけじゃなく、iso-2022-jpのメールも正しく受信できるか試したかったので、nodemailerで送信しようと思いましたが、どうやらnodemailerがiso-2022-jpに対応していない。。

解析するmailparserの例は見つかるけど、iso-2022-jpで送信するサンプルが見つからないので、試した結果、なんんとかiso-2022-jpで送信でき、Yahooメール、Gmailなど主要なサービスでも正しく表示されました。

iconvで変換したiso-2022-jpの文字列をsubjectなどに渡しても、「Content-Type: text/plain; charset=ISO-2022-JP」にはなりません、Content-TypeはUTF8で本文などがiso-2022-jpで文字化けします。

なのでrawを使って強制的にパラメータを指定します。

let message = {
    envelope: {
        from: "from@gmail.com",
        to: ["to@gmail.com"]
    },
    raw: `Content-Type: text/plain; charset=ISO-2022-JP
From: =?ISO-2022-JP?B?` + new Buffer(iconv.convert("nodemailerです").toString()).toString("base64") + `=?= <from@gmail.com>,
To: to@gmail.com
Subject: =?ISO-2022-JP?B?` + new Buffer(iconv.convert("ISO-2022-JPのメール").toString()).toString("base64") + `=?=
` + iconv.convert("nodemailerでISO-2022-JPのメールを送信したい( Mailparserじゃなくて送信)").toString()
};

smtpTransport.sendMail( message , function(error, r) {

これで送信すると、「Content-Type: text/plain; charset=ISO-2022-JP」で送信され、文字化けもなくクライアント側でもISO-2022-JPとして認識されて本文などが表示されます。

Twilio-PHP-SDK 4.xのdialを5.xにアップデートでDOMExceptionエラー(response->dialを5.xに対応させる)

TwilioPHP-SDKの4.xで書かれたこんなカンファレンスへの誘導と、完了後にsayするconference_complet.phpへのdial発信

着信のwebhookで起動します。

include './twilio-php/Services/Twilio.php';
include './twilio-php/Services/Twilio/Capability.php';

$response = new Services_Twilio_Twiml();
$dial = $response->dial(array(
	'action' => "https://***.com/conference_complet.php",
 	"method" => "GET",
));
$dial->conference("My Conference", array(
	"startConferenceOnEnter" => "true",
	"waitUrl" => "https://***.com/conference_wait.php",
 	"endConferenceOnExit" => "true",
 	"beep" => "true",
));
print $response;

dialの部分を下記のようにTwilio-PHP-SDK ver5.xで書いたのですが、print responseでXMLのDOMエラーが発生しました。

PHP Fatal error:  Method Twilio\\TwiML\\VoiceResponse::__toString() must not throw an exception, caught DOMException: Invalid Character Error 

conferenceは動くので、dialに問題があるようです。

$response = new VoiceResponse();

$dial = $response->dial([
	'action' => "https://***.com/conference_complet.php",
 	"method" => "GET",
));
print $response;

4.xで出力されるTwiMLは下記のようになっており、Dial要素の中はConferenceなので、dialにはactionなどのパラメータしか入力していないのですが、5.xではエラーになります

<?xml version="1.0" encoding="UTF-8"?>
<Response>
<Dial action="https://***.com/conference_complet.php" method="GET">
<Conference startConferenceOnEnter="true" waitUrl="https://***.com/conference_wait.php" endConferenceOnExit="true" beep="true">My Conference</Conference>
</Dial>
</Response>

下記のようにdialの引数を変更すると、動作します。

$response = new VoiceResponse();

$dial = $response->dial("",[
	'action' => "https://***.com/conference_complet.php",
 	"method" => "GET",
));
print $response;

<?xml version="1.0" encoding="UTF-8"?>
<Response>
<Dial action="https://***.com/conference_complet.php" method="GET">
<Conference startConferenceOnEnter="true" waitUrl="https://***.com/conference_wait.php" endConferenceOnExit="true" beep="true">My Conference</Conference>
</Dial>
</Response>

ITMS-90809: Deprecated API Usage (UIWebView APIを使用したアプリアップデート) 対策でGoogle-Mobile-Ads-SDKを更新

iOSアプリにちょっと修正を加えてアップロードしたら、こんなメッセージを受けました。

最新の配信で、1つ以上の問題が確認されました。配信は成功しましたが、次の配信では以下の問題を修正してください。ITMS-90809: Deprecated API Usage – Appleは2020年12月以降、UIWebView APIを使用したアプリアップデートの投稿を受け付けなくなります。詳細は https://developer.apple.com/documentation/uikit/uiwebview を参照してください。問題を修正したら、新しいバイナリをApp Store Connectにアップロードしてください。よろしくお願いします。App Store チーム

UIWebViewを利用していると表示されるのですが、アプリ本体はwkWebviewにしばらく前から移行してるので、何かのライブラリが原因のようです。

プロジェクトのディレクトリでfindしてみたらadmobのライブラリのようです。

Binary file ./Pods/Google-Mobile-Ads-SDK/Frameworks/frameworks/GoogleMobileAds.framework/GoogleMobileAds matches

admobのリリースノートにも、2020‑02‑28(7.56.0)で対応されてます。

https://developers.google.com/admob/ios/rel-notes

Warning: Calling this method may negatively impact your Google mediation performance. This method should only be called if you include Google mediation adapters in your app, but you won’t use mediate through Google during a particular app session (for example, you are running an A/B mediation test).

cocoapod経由でアップデートします。

pod update Google-Mobile-Ads-SDK
Updating local specs repositories

CocoaPods 1.8.4 is available.
To update use: `sudo gem install cocoapods`

For more information, see https://blog.cocoapods.org and the CHANGELOG for this version at https://github.com/CocoaPods/CocoaPods/releases/tag/1.8.4

Analyzing dependencies
Downloading dependencies
Installing Google-Mobile-Ads-SDK 7.57.0 (was 7.25.0)
Installing GoogleAppMeasurement (6.1.2)
Installing GoogleUtilities (6.5.2)
Generating Pods project
Integrating client project
Pod installation complete! There are 3 dependencies from the Podfile and 11 total pods installed.

アップデートしたところ、admob関連でアプリが落ちるので、調べてみると

*** Terminating app due to uncaught exception 'GADInvalidInitializationException', reason: 'The Google Mobile Ads SDK was initialized without an application ID. Google AdMob publishers, follow instructions here: https://googlemobileadssdk.page.link/admob-ios-update-plist to set GADApplicationIdentifier with a valid app ID. Google Ad Manager publishers, follow instructions here: https://googlemobileadssdk.page.link/ad-manager-ios-update-plist'
*** First throw call stack:
(
	0   CoreFoundation                      0x000000010a7f81ab __exceptionPreprocess + 171
	1   libobjc.A.dylib                     0x0000000109e8df41 objc_exception_throw + 48
	2   CoreFoundation                      0x000000010a7f80f9 -[NSException raise] + 9
	3   myapp02                      0x0000000104cffabb GADApplicationVerifyPublisherInitializedAnalyticsCorrectly + 414
	4   myapp02                      0x0000000104cb05d6 GADEnvironmentIsSupported + 1020
	5   libdispatch.dylib                   0x000000010da893f7 _dispatch_call_block_and_release + 12
	6   libdispatch.dylib                   0x000000010da8a43c _dispatch_client_callout + 8
	7   libdispatch.dylib                   0x000000010da8f352 _dispatch_queue_override_invoke + 1458
	8   libdispatch.dylib                   0x000000010da961f9 _dispatch_root_queue_drain + 772
	9   libdispatch.dylib                   0x000000010da95e97 _dispatch_worker_thread3 + 132
	10  libsystem_pthread.dylib             0x000000010df529f7 _pthread_wqthread + 220
	11  libsystem_pthread.dylib             0x000000010df51b77 start_wqthread + 15
)
libc++abi.dylib: terminating with uncaught exception of type NSException

Google Ad Managerで配信している場合に必要な設定が増えているようです。

info.plistにGADIsAdManagerAppのキーを作成して、YESを設定

Softether VPN Server のVPN(L2TP/IPsec)にMacから接続できない[サーバーとの接続が確立ができません]

リモートワークに伴い、事務所のPCへのリモートアクセスだけでは不便なので、VPN(L2TP/IPsec)のVPNサーバーを構築しました。

UbuntuのサーバーにSoftetherをインストールして、WindowsのVPN サーバー管理マネージャーから設定しました。

Mac用のVPN サーバー管理マネージャ ーもあるのですが、起動しない?ので急ぎでほしいので一旦Windowsで設定しました。

https://ja.softether.org/4-docs/2-howto/L2TP_IPsec_Setup_Guide/1

設定は完了しているのですが、macにVPNを設定して接続しても「サーバーとの接続が確立ができません」と出てしまうので、CUIから設定します。

# ./vpncmd
vpncmd command - SoftEther VPN Command Line Management Utility
SoftEther VPN Command Line Management Utility (vpncmd command)
Version 4.34 Build 9745   (English)
Compiled 2020/04/05 23:39:56 by buildsan at crosswin
Copyright (c) SoftEther VPN Project. All Rights Reserved.

By using vpncmd program, the following can be achieved.

1. Management of VPN Server or VPN Bridge
2. Management of VPN Client
3. Use of VPN Tools (certificate creation and Network Traffic Speed Test Tool)

Select 1, 2 or 3: 1

Specify the host name or IP address of the computer that the destination VPN Server or VPN Bridge is operating on.
By specifying according to the format 'host name:port number', you can also specify the port number.
(When the port number is unspecified, 443 is used.)
If nothing is input and the Enter key is pressed, the connection will be made to the port number 8888 of localhost (this computer).
Hostname of IP Address of Destination:未入力でエンター

If connecting to the server by Virtual Hub Admin Mode, please input the Virtual Hub name.
If connecting by server admin mode, please press Enter without inputting anything.
Specify Virtual Hub Name:未入力でエンター
Password: ********GUIのツールで入れた管理パスワード

VPN Server>HubList
HubList command - Get List of Virtual Hubs
Item              |Value
------------------+-------------------
Virtual Hub Name  |VPN ( GUIで作成したHubが表示される )
Status            |Online
Type              |Standalone
Users             |1
Groups            |0
Sessions          |0
MAC Tables        |0
IP Tables         |0
Num Logins        |0
Last Login        |2020-04-07 17:25:03
Last Communication|2020-04-07 17:25:04
Transfer Bytes    |7,077
Transfer Packets  |21
The command completed successfully.
VPN Server>UserList
UserList command - Get List of Users
Before executing this command, first select the Virtual Hub to manage using the Hub command.
VPN Server>HUB VPN ハブを選んでから
VPN Server/VPN>UserList
UserList command - Get List of Users
Item            |Value
----------------+-------------------------
User Name       |dp-user
Full Name       |dp-user
Group Name      |-
Description     |
Auth Method     |Password Authentication
Num Logins      |0
Last Login      |2020-04-07 (Tue) 17:25:03
Expiration Date |No Expiration
Transfer Bytes  |7,077
Transfer Packets|7,077
The command completed successfully.

VPN Server/VPN>IPsecEnable
IPsecEnable command - Enable or Disable IPsec VPN Server Function
Enable L2TP over IPsec Server Function (yes / no): yes

Enable Raw L2TP Server Function (yes / no): no

Enable EtherIP / L2TPv3 over IPsec Server Function (yes / no): no

Pre Shared Key for IPsec (Recommended: 9 letters at maximum): xxyba

Default Virtual HUB in a case of omitting the HUB on the Username: VPN

The command completed successfully.

VPN Server/VPN>
VPN Server/VPN>SecureNatEnable
SecureNatEnable command - Enable the Virtual NAT and DHCP Server Function (SecureNat Function)
The command completed successfully.

VPN Server/VPN>

最後のSecureNatEnableがキモで、これでMacから接続が出来るようになりました

UbuntuにSoftEther VPN Serverをインストールしようとしたら/runのサイズ不足エラー(Failed to reload daemon: Refusing to reload)

リモートワークで事務所にあるPCを踏み台にしていましたが、事務所のネットが安定しないので、念の為もう一台別でVPNサーバーを準備しようと思い、開発サーバーにしていたConohaVPSの512MBプランにインストールしましたが、systemctlのサービス登録でエラーがでました。

Failed to reload daemon: Refusing to reload, not enough space available on /run/systemd. Currently, 15.3M are free, but a safety buffer of 16.0M is enforced.

root@oreno-dev-server:/var# df -h
Filesystem      Size  Used Avail Use% Mounted on
udev            211M     0  211M   0% /dev
tmpfs            49M   33M   16M  69% /run
/dev/vda2        20G   11G  8.1G  57% /
tmpfs           241M     0  241M   0% /dev/shm
tmpfs           5.0M     0  5.0M   0% /run/lock
tmpfs           241M     0  241M   0% /sys/fs/cgroup
tmpfs            49M     0   49M   0% /run/user/0
/dev/loop1       92M   92M     0 100% /snap/core/8592
/dev/loop2       92M   92M     0 100% /snap/core/8689
root@crypt-webdb-dev:/var#

メインメモリが512Mなので動的に49Mなんですかね、fstabには指定がなかった。

root@oreno-dev-server:/var# ls -lah /tmp/
total 5.3M
drwxrwxrwt  9 root root 4.0K Apr  7 15:51 .
drwxr-xr-x 23 root root 4.0K Mar 18 06:35 ..
drwxrwxrwt  2 root root 4.0K Jun 20  2019 .ICE-unix
drwxrwxrwt  2 root root 4.0K Jun 20  2019 .Test-unix
drwxrwxrwt  2 root root 4.0K Jun 20  2019 .X11-unix
drwxrwxrwt  2 root root 4.0K Jun 20  2019 .XIM-unix
drwxrwxrwt  2 root root 4.0K Jun 20  2019 .font-unix
-rw-------  1 root root 2.7M Apr  7 14:33 .unicode_cache_225fcb7e.dat
-rw-------  1 root root 2.6M Apr  7 14:04 .unicode_cache_85d392aa.dat

tempfsのサイズ的にはデカいdatファイル”.unicode_cache”がある。ぐぐるとSoftEtherのキャッシュファイル?一旦削除してサービス登録だけ終わらせます。

佐川急便を装ったSMSスパムが届いて謎のAPK(ウィルスアプリ?)をダウンロードを手に入れたのでAndroidStudioでAPKを解析してみる

SMSが080の携帯番号から届いき、開いてみたら「お客様宛にお荷物のお届けがありましたが、不在の為持ち帰りました。下記よりご確認ください http://nehsu.com」とあり、アマゾンデリバリープロバイダーはシステムの関係で080から来るのか?などいろいろ考えましたが、ドメインも変なんで好奇心に負けてクリックしました。

記載のドメインにはアクセスしないでください、後述する変なapk(多分ウィルス)が落ちてきます。

アクセスすると、リダイレクトされてまんま佐川のコピーサイト( asxvz.xyz )に着地します。

ぱっとみは良くできたコピーサイトですが、さっそくsagawa6.5.8.apkが落ちてきます。

sagawa6.5.8.apkの中ですが、com.fkpc.exjjというパッケージでバージョンコードは「32321」と結構アップデートあるみたいです。

権限はてんこ盛りです。

 <uses-permission android:name="android.permission.RECEIVE_BOOT_COMPLETED" />
    <uses-permission android:name="razjol.toyiac.fhvydtoj" />
    <uses-permission android:name="wruqaloi.mnqrnd.ewnucr" />
    <uses-permission android:name="android.permission.WAKE_LOCK" />
    <uses-permission android:name="android.permission.INTERNET" />
    <uses-permission android:name="android.permission.WRITE_EXTERNAL_STORAGE" />
    <uses-permission android:name="android.permission.READ_EXTERNAL_STORAGE" />
    <uses-permission android:name="android.permission.ACCESS_NETWORK_STATE" />
    <uses-permission android:name="android.permission.READ_PHONE_STATE" />
    <uses-permission android:name="android.permission.RECEIVE_SMS" />
    <uses-permission android:name="android.permission.RECEIVE_MMS" />
    <uses-permission android:name="android.permission.READ_SMS" />
    <uses-permission android:name="android.permission.WRITE_SMS" />
    <uses-permission android:name="android.permission.SEND_SMS" />
    <uses-permission android:name="android.permission.DISABLE_KEYGUARD" />
    <uses-permission android:name="android.permission.READ_CONTACTS" />
    <uses-permission android:name="android.permission.CHANGE_WIFI_STATE" />
    <uses-permission android:name="android.permission.ACCESS_WIFI_STATE" />
    <uses-permission android:name="android.permission.SYSTEM_ALERT_WINDOW" />
    <uses-permission android:name="android.permission.SYSTEM_OVERLAY_WINDOW" />
    <uses-permission android:name="android.permission.CHANGE_NETWORK_STATE" />
    <uses-permission android:name="android.permission.CALL_PHONE" />
    <uses-permission android:name="android.permission.EXPAND_STATUS_BAR" />
    <uses-permission android:name="android.permission.GET_ACCOUNTS" />
    <uses-permission android:name="android.permission.MODIFY_PHONE_STATE" />
    <uses-permission android:name="android.permission.PACKAGE_USAGE_STATS" />
    <uses-permission android:name="android.permission.REQUEST_IGNORE_BATTERY_OPTIMIZATIONS" />
    <uses-permission android:name="android.permission.RECORD_AUDIO" />
    <uses-permission android:name="android.permission.MODIFY_AUDIO_SETTINGS" />
    <uses-permission android:name="android.permission.DISABLE_KEYGUARD" />

怖くて起動はしてないけど、stringsに佐川急便の文字がある。

classes.dexはあとでゆっくり覗いてみる。

RaspberryPi B+のIPを探す – Raspbian ヘッドレスインストール

我が家はデスクトップはiMacのみで、モニターやキーボードを準備するのが面倒なのでRaspberryPiのセットアップはいつもヘッドレスで行っています。

sshファイルとwpa_supplicant.confの設定してbonjourかarpの一覧表示でIPを調べられます。

RC211v-mbp:Downloads dp$ ping raspberrypi.local
PING raspberrypi.local (192.168.1.39): 56 data bytes
64 bytes from 192.168.1.39: icmp_seq=0 ttl=64 time=3.794 ms
64 bytes from 192.168.1.39: icmp_seq=1 ttl=64 time=3.411 ms
^C
--- raspberrypi.local ping statistics ---
2 packets transmitted, 2 packets received, 0.0% packet loss
round-trip min/avg/max/stddev = 3.411/3.603/3.794/0.192 ms
RC211v-mbp:Downloads dp$


RC211v-mbp:Downloads dp$arp -a
? (169.254.118.171) at b8:27:eb:97:d6:6d on en0 [ethernet]
? (192.168.1.1) at e4:7e:66:34:1b:58 on en0 ifscope [ethernet]
? (192.168.1.6) at (incomplete) on en0 ifscope [ethernet]
? (192.168.1.7) at (incomplete) on en0 ifscope [ethernet]
? (192.168.1.8) at (incomplete) on en0 ifscope [ethernet]
? (192.168.1.9) at 18:65:90:d0:51:5 on en0 ifscope permanent [ethernet]
? (192.168.1.10) at (incomplete) on en0 ifscope [ethernet]
? (192.168.1.11) at (incomplete) on en0 ifscope [ethernet]
? (192.168.1.12) at f0:81:73:98:aa:5b on en0 ifscope [ethernet]
? (192.168.1.13) at (incomplete) on en0 ifscope [ethernet]
? (192.168.1.14) at (incomplete) on en0 ifscope [ethernet]
? (192.168.1.15) at (incomplete) on en0 ifscope [ethernet]
? (192.168.1.16) at (incomplete) on en0 ifscope [ethernet]
? (192.168.1.22) at 7c:61:66:da:d7:41 on en0 ifscope [ethernet]
? (192.168.1.39) at b8:27:eb:97:d6:6d on en0 ifscope [ethernet]
? (192.168.1.255) at ff:ff:ff:ff:ff:ff on en0 ifscope [ethernet]
? (224.0.0.251) at 1:0:5e:0:0:fb on en0 ifscope permanent [ethernet]
? (239.255.255.250) at 1:0:5e:7f:ff:fa on en0 ifscope permanent [ethernet]

PHP Eloquentで既存のPDOを利用する – 既存プロジェクトにEloquent追加

既存の独自フレームワークに新しい機能を追加する機会があり、DB周りを確認したのですが、PDOをゴリゴリに使っており、サニタイズも独自だったのでせめて追加の部分はライブラリ(Eloquent)を利用して安全にしたいと思いましたが、追加分の為にフィルター系の処理をEloquentで別で作って管理するのは別の題もあるので、PDOは残しつつ、Eloquentを利用しようとおもいます。

が、 PDOと別でEloquentでコネクションを作るのはトラブルの元なので、既存処理で接続状態になっているPDOを利用します。

いつもだと

$capsule = new Capsule;
$capsule->addConnection([
	'driver' => 'mysql',
	'host' => 'db.local',
	'database' => 'test',
	'username' => 'db_test',
	'password' => 'pass0000',
	'charset' => 'utf8',
	'collation' => 'utf8_unicode_ci',
	'prefix' => '',
]);
$capsule->setAsGlobal();
$capsule->bootEloquent();

上記の様にEloquent単体で利用する場合は、Capsuleを初期化してますが今回は既存のPDOがあるので、下記の様にしてMySqlConnectionを生成してEloquentのModelに渡します。

$existPDO = 既存のPDOオブジェクトを取得();
$mySqlCon = new MySqlConnection($existPDO);
$resolver = new ConnectionResolver([$mySqlCon]);
$resolver->setDefaultConnection(0);
Model::setConnectionResolver($resolver);

上記でSELECTは動作したのですが、Eloquent Modelでsaveが動きませんでした。EloquentのQueryLogを確認しても問題ないクエリですし、エラーも出ません。save()の戻りもtrue。。

試しにEloquentのモデル側でconnectionをdefault指定したのですが、queryエラーが出たので、どうやらsetDefaultConnection(0)では更新時には’default’として働かない?ようなので、下記に変更しました。


$mySqlCon = new MySqlConnection($existPDO);
$resolver = new ConnectionResolver();
$resolver->addConnection('default', $mySqlCon);
$resolver->setDefaultConnection('default');
Model::setConnectionResolver($resolver);

YDLIDAR X2Lを買ってみた( ROSに接続前にWindowsで動作チェック)

ROSでSLAMやりたいので、YDLIDAR X2を購入しました。

YDLIDAR X4はレビューをよく見るのですが、X2Lって(X2と違う?)機種を見つけてX4でもリーズナブルなんですが、さらにサンプリングレートと範囲がさがってるお手軽版のようなので買ってみました。

YDLIDAR X2L

  • スキャン範囲:半径8 m
  • サンプリングレート:3000 Hz
  • 8500円くらい

YDLIDAR X4

  • スキャン範囲:半径10 m
  • サンプリングレート:5000 Hz
  • 12,000 円くらい

スイッチサイエンスは在庫切れになってたので、送料込みでほとんど変わらないのでAmazonで購入しました。

まずは、初期不良は嫌なので、とりあえずparallels desktopで実行しているWindows10で簡単な動作だけチェックしました。

YDLIDAR X2Lのソフトウェア

YDLIDAR X2( L付 )のソフトウェアですが、なぜか公式サイトでX2を選んでSoftをクリックすると、404にリダイレクトされるですが、下記のマニュアルにファームのリンクはありました。

また、PointCloudViewerはX2でもX4でも一緒で起動時に機種を選択するので、YDLIDARX4のリンクからダウンロードしました。

YDLIDAR X2( L付 )のファームウェアダウンロードリンク

YDLIDAR X2のマニュアルダウンロードリンク